Pages

Monday, October 31, 2011

Happy Halloween!

Just thought I'd share a photo of my son and I all dressed up for trick-or-treating! Well, my son was dressed up as a pirate, I was halfway done. I was a scarecrow with no stuffing! Didn't have any straw handy! And the patches on my face was painted on with paint dabbers! It came off fairly well! My son got lots of candy and of course that made him happy! My DH carved out the pumpkin that my son grew in our garden. And he stayed at the house to pass out candy. Have a spooktacular day, thanks for flying by!

Friday, October 28, 2011

CAS!

Just a quick post to enter the Friends With Flair over at the Unity blog! I made a quick CAS card using a Unity sentiment stamp that I got from the Unity challenge winnings! Love Unity's stamps!! The papers are from the Authentique Journey pad. Go join in the FWF, or just go see all the awesome Unity goodness! Thanks for stopping by!

Thursday, October 27, 2011

Black and Gray all the way!

Well I finally got a new web browser for viewing and commenting on blogs. I downloaded Google Chrome, and it works perfectly. I can finally get on those blogs that I haven't been able to in months. For some reason, Internet Explorer has some conflicts with blogs! One of those blogs is Gingersnap Creations. I've missed entering and even commenting on their blog, and now I can! Finally! They have a challenge right now to use black and grays, and although there is some kind of Poe theme as well, mine isn't anything close to that! But the colors are right on! I chose to do pretty and sophisticated, instead of dark and dreary since it's close to Halloween and all. Not my usual style by any means, but I was up for the challenge. So if you'd like to see more black and gray creations, or enter yourself, click the link above!
Materials List:
Embossing folders, embossing powder, Unity Stamps, Stampin Up! ink, Versamark, Creative Memories cardstock, lace, ribbon, and buttons from my stash. 

Tuesday, October 25, 2011

Celebrate

Stampin Up! demo Holly, is having a sketch challenge on her Rubber Redneck STAMPede blog. All you Stampin Up! fans head on over there! I followed the sketch just as it was, and used some retired stamps sets, and colors.  The DP I got from Holly's Fall Fest course, and love the design on it! She's also starting a new Winter Wonderland online class soon if your interested, you can read about it on her link above. Thanks for stopping by!
Materials List:
Stampin Up! stamp sets, Artifacts(2005), Everyday Flexible Phrases(2004)
Stampin Up! ink in Really Rust
Stampin Up! cardstock in Very Vanilla, Mellow Moss, Really Rust, Chocolate Chip
Stampin Up! Scallop Border Punch, Oval Punch, Hemp Twine, and Perfect Details Texturz Plate

She's Got Legs!

Ok, so I don't have legs like this anymore, but when I was younger I wanted to be one of the ZZ Top girls. You can laugh, it's OK! Well, this image sure has legs, and she knows how to use them! This is another image from The Stamping Boutique that I colored in with my pencils. I'm still learning the whole shading technique. I have not jumped on the Copic bandwagon, I can't see myself buying tons of colors of markers. Although they look nice, I'll stick with my pencils! I kind of quit putting a list of materials used on my post, but I should start again. So below is what I used to make this card. Have a wonderful day!
Materials used:
All patterned paper from Lily Bee Designs-Picket Fence
Distress Inks in Vintage Photo, Dusty Concord, Ripe Persimmon, Fired Brick
Watercolor Pencils
Tattered Florals Sizzix die
Pinking Shears, EK Success Border Punch, Stampin Up oval punch
Rhinestones, Sewing Machine, Foam Dots

Monday, October 24, 2011

Mr. Scarecrow

I came across a Unity Stamp Co.'s artist, Tracey Malnofski. She designs for Unity, but also has her own site The Stamping Boutique, where she sells her hand drawn art in digital stamps. This scarecrow is one I got over the weekend. He is colored with my watercolor pencils on thick cardstock. The bg paper I also colored with Ripe Persimmon DI, it was just a cream color. Added some rick rack and buttons. I still need to add a few elements maybe, but I didn't want to take away from the scarecrow image. I think he's so cute! I am linking this to 2 Sister's Challenge Blog, where the theme is pumpkin patch. And you could win something from Tracey if you enter! Thank you for stopping by!

Friday, October 21, 2011

Halloween Cutie

I recieved my package of stamps that I won from Unity yesterday!!! Soooo many cute stamps were in there, including this little witchy woman! She's so adorable, and I had to color her in with my watercolor pencils. I don't usually send out halloween cards, but I just couldn't resist! The papers are from the Authentique Glowing paper pad, and I used Black Soot, and Crushed Concord DI. The stitching is a funky one on my sewing machine, and it's done in purple thread. I am linking this up to Unity Friends With Flair Fridays. Have a wonderful weekend everyone!

Thursday, October 20, 2011

For My DH

I made this card for my husband's birthday, which is tomorrow. I'm hoping he'll let me take him out to dinner! I've ordered him a few things from Duluth Trading and should be in today's mail, so that should make him happy! I'm sorry my pics aren't vey good. I finally got a new camera, top of the line 14mp. And do you think I can take a good picture with it? HA! If anyone has some advice for a point and shoot camera, please do tell!! I'm linking this up to 2 Sister's Challenge Blog, where they have a sketch to follow. The card looks alot better in person! The card base is Coordinations paper, the other papers are from Karen Foster, even the deer that I fussy cut out. The sentiment is a clear stamp from Hero Arts. And the twine is from Stampin Up! Thanks for looking in!

Wednesday, October 19, 2011

Hope

I made this card for 2 challenges. Splitcoast Stampers has a Hope You Can Cling To card drive going on to benefit the people battling breast cancer. For more info on that click here. I have added this to my SCS gallery here. And the {ippity} blog is challenging us to enter the SCS card drive here. It really is a wonderful challenge despite getting prizes. We are to mail our cards to the address given at SCS, and they will be given to patients and their families. So please join in on this wonderful cause! Oh, and I chose the real men wear pink masculine card challenge!

Monday, October 17, 2011

Better Paper Pumpkin!


I follow a Stampin Up! demo's blog, which I just love! I've shared links to her blog before along with videos, and today Holly posted a paper pumpkin project with video! To see how she makes hers, click here.  This one here is the second one I made, and I changed mine a bit. I used 7 strips of paper, and instead of knotting the ribbon at the bottom, I folded the ribbon over and used a big glue dot to hold it in place. This makes the pumpkin sit flatter. I didn't add any leaves like hers, just the twisted paper vines. Go check out her video, and make some of your own!

Workshop Time Again!

I have made these little note cards for my next workshop! They are all 3"x4" and also a little box to keep them in. You can make more of your own and put in there, or give the whole thing as a gift! I got the design from Emily's blog post! I knew I could incorporate her design into a smaller size! Thanks Emily for the inspiration! All the papers I used are from Authentique and Lily Bee Designs, the label stamps are {ippity}, and I used various punches and stamps for the embellishments. Thanks for stopping by!

Friday, October 14, 2011

New Fall and Christmas Items!

I've been adding a lot more products to my online store this week! I've also changed the buying format a bit, so I can have more products in my store. You can check out the info on my home page here, or on the stores blog here. The pic above are chipboard shapes from Little Yellow Bicycle from their new line Hello Fall. I think they are the cutest, and will look great on my scrapbook pages! I have also added papers, stamps, and dies from different companies like, Teresa Collins, Making Memories, Spellbinders, and a few Tim Holtz Alterations. Go check them out, and pass the word! Here are just a few of the new items!
Teresa Collins clear stamps!
Authentique Wonder Paper!
Spellbinders Poinsettia's!


Tuesday, October 11, 2011

Ippity Chick Challenge

The Ippity Chicks have set up a sketch challenge blog, and each week one chick will be giving away some Ippity goodness! This week Sherri Thompson is the sponser and she has picked a sketch which you can find all of the info here. My sentiment is of course an Ippity one, and I got my shaped card from the Top Note Sizzix die. My flower was made with a Martha Stewart border punch, and I have instructions for making them below. My sweet blog friend Emily sent me a get well card last week because I wasn't feeling well(thanks so much Emily!), so that's what prompted me to make this one. Click the Chick Challenge link above to see more Ippity, or to join in!
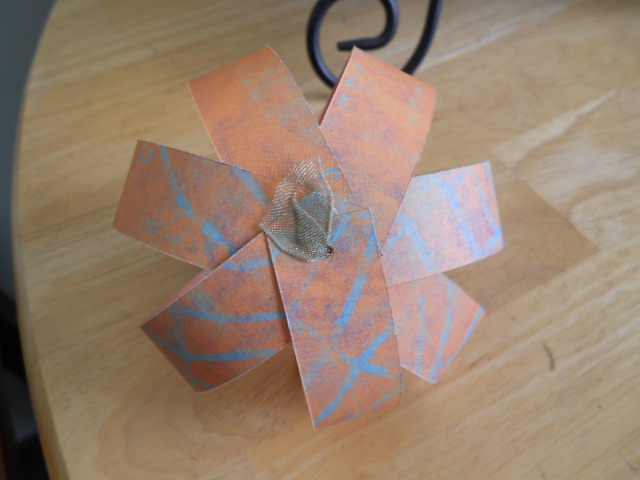
The punch on the left I just got, and it makes a rolled flower as shown here. The other punch is a normal size EK Success border punch. While I like the look of the flower that this new punch makes, it is not good for mailing at all. It stands up too tall.
So I racked my brain a bit, and come up with this flower using the same punch. Quite different, but much flatter for mailing. So here's how it's made.
Punch any length with the punch, mine is 8 1/2" This punch will also leave a 1/4" border at the bottom. If using a regular border punch, trim your's to 1/4" Start folding the strip as shown. I also cut a 1 1/4" circle and applied some super tacky adhesive. This will be used to attach your strips on.
Punch 2 more strips and start folding them in the same way, except make the folds smaller than the one before. I used 3 strips on my flower.
Once your strips are all folded, overlap the two ends and glue in place. I used a glue pen, but any glue should work. The second flower in this pic is what yours should look like after folding and gluing. It's not flat I know, but push down your flower and crease the folds good, and you will have a flat piece like the third one shown.
Now, start layering each one on your circle. You may need to add more adhesive for the last one.
This is what it should look like with all three strips. The center isn't very attractive, so I added a large button. The purple flower here is from the punch shown above, and the one on my card is a Martha Stewart border punch. So any one will work really, just make sure your folds keep getting smaller on the 3 strips!


Monday, October 10, 2011

Paper Punch Pumpkins Tutorial

If you're looking for the Flasback Friday challenge post, click here! I've been using my punches a lot lately, and realized I don't need my fancy cricut machine or even my Sizzix dies(which are still great for cutting chipboard!) I started my paper crafting adventure with die cuts, and have missed using them on my projects. So I was scanning Youtube for punch art, and saw these cute pumpkins made with scalloped ovals. You can use plain ovals as well! So here is my little tutorial on how I made mine.
Start with 6 punched ovals, and stamp or ink them as desired.
Ahere the 2 bottom pieces together as shown, and add a piece of twine, yarn, or ribbon for the stem. For the next layer, adhere sticky back foam as shown. The one on the right is offset on purpose, so when you attach them to the bottom piece, the foam isn't in the way.
Layer them on the bottom as shown. For the top piece, adhere foam in the middle.
Attach to the middle pieces as shown.
Here is a side view of mine. I did use a thinner type of foam so I could mail them without being too thick. For a scrapbook page though, thicker foam would be fine. Thanks for looking at my little punch art today, and I have some fabulous flowers to share later made with border punches!!

Friday, October 7, 2011

Flashback Friday 16.0!

I am the Guest Designer this month at Flasback Friday Challenges! Each month there is a different theme for you to enter your 'first' post or pic of a project you made. I won last month, so I got to choose what the 'first' is, and I chose your first tag! Which mine is above. I used a masking technique on this tag, and really like how it turned out! Get your entry in, as there is a super prize this month! The sponser is Paper Issues and you can find their blog here. Check out this awesome prize package!
You have until October 28th to link up your first tag at Flashback Friday. Can't wait to see all your creations!!

Thursday, October 6, 2011

More Pumpkins + a Video!

I have been wanting to do a video for awhile, but my digital camera quit working. I finally got a new one, and am figuring it out still, took me 4 takes to get this short video done! Anyway, here is another pumkin I learned how to do recently. and thought I'd share it with you! I'll try working on another one today, maybe just a picture tutorial! I still have this dreadful cold, so my voice sounds horrible, and I somehow cut my self off at the end, so you don't here me say 'thanks for watching!' So, enjoy!!

Monday, October 3, 2011

Fall Treat Bag


Fall is the perfect time to start making and giving those holiday treats. Whether it be apple muffins, to my favorite, peanut butter fudge! You need a little gift package to put them in. I saw this gift bag tutorial on the Glue Arts blog here, and it's very easy to do. No cutting of paper, no tabs, and uses one 8 1/2 by 11 piece of paper. I am entering this to Unity's monthly challenge here, to use leaves. The stamp set I used is Unity Store Kit called, Harvest of Memories. I took one leaf stamp, and the 3 new colors of distress inks, and made my own DP. The labels were cut with my Spellbinders dies and the Authentique Blissful paper pad. I then stamped the sentiment with Stazon ink. I also used the leaf stamp on more papers from this pad, and cut them out, and popped them behind the label. I punched holes in the top, and tied ribbon for the handles. Very cute, and perfect for holding some goodies! Check the links above to make your own goodie bag, or join in on Unity's challenge, there is 100+ random stamps up for grabs!!

Saturday, October 1, 2011

Happy World Card Making Day!


I had to join in on World Card Making Day, and make a card to post today. I've had these Quickutz dies of the globe for some time, and have never used them. I thought today was a perfect time to use them! The background map stamp is from The Artistic Stamper, that I won from Jennie's blog this summer. Fits perfect with this theme. The ticket style stamp is an older Stampin Up one, and the sentiment is computer generated. I used Antique Linen, and the new Gathered Twigs distress inks, as well as my fav, Broken China. I stamped the map again on this inside, and put some Basic Grey paper for journaling on instead of a sentiment. Hope you get some time to create today!