Pages

Wednesday, April 30, 2014

Mini Album

My upline, Holly, sent me the sweetest mini album last month, and I just adore it! So, I wanted to create one myself, to give as a gift. I have just started, so I only have the cover, and two inside pages done. It is made completely with cardstock, and a little dsp, no chipboard, or coasterboard! And it is very sturdy, that's one reason I love Stampin' Up!'s cardstock, because it is the perfect thickness, no too thin, not too thick! The first picture shows the front cover, it's just about 5 inches square. And here are two inside pages:
I have used a combination of current and retired items so far, and I love how well they all go together!
Thanks so much for having a look, and have a wonderful day!!


Tuesday, April 29, 2014

Clearance Rack and Retired List

Hello there! I just wanted to post an update of some new items added to the Clearance rack on my Stampin Up site! And also the retired list items are going FAST!!! My goodness! I will be posting a project for you all tomorrow, in the meantime have a great evening!

Monday, April 28, 2014

Best Friend

The card I have to share today was inspired by one in the new Summer issue of Paper Creations magazine. It is made by my blog friend Michelle Woerner. Her card is a little different, but has the same layout. I covered four strips of Very Vanilla cardstock with the Gingham garden washi tapes. I glued them down onto a Melon Mambo card base. I punched a 2 1/2" circle from Pear Pizzaz, and glued some loops of Island Indigo bakers twine. The stamped image is from the Label Love stamp set, and I punched it out with the Artisian Label punch, and added a few petite petals punched flowers. I think this is very bright and spring like, perfect for this time of year!
The retired list that Stampin Up has out includes the washi tape and bakers twine I used here. Click the link on my sidebar to see all the retired items!
Thanks for stopping by!

Friday, April 25, 2014

For the Birds Step Card

My new Summer Card Maker magazine has a few step card tutorials in it, and I thought I would try one that I haven't done before. For the main image, I used the SU stamp set called For the Birds. It's stamped onto watercolor paper, and I again used the blender pen and inks to color it in. The flowers in the background are from the Petite Petals stamp set, and I used it's coordinating punch to punch out two flowers for the bottom. The dsp is from the Fresh Prints stack, which Holly sent me a few samples of. I don't know why I don't have these papers yet, as I love the colors and patterns! Here is a side view of the step card:
Super easy to do, and it will still fit into a standard A2 envelope! Thank you for having a look, and have a great weekend!!


Thursday, April 24, 2014

Watercolor With Stampin Up!

Hey there! My card share today uses the watercolor paper, and blender pen that is available through Stampin Up. The stamps come from the soon-to-be retired Hostess set, Simply Sketched. My Upline Holly sent me this set, and it's really beautiful! I love how the coloring turned out on this poppy. I used Pumpkin Pie, and Real Red ink to give it the perfect orange/red color. The stems are the soon to retire Gumball Green. The sentiment is also from this set, and I love it's scripty font.
Some items are already selling out since the Retired List posted on Monday. Everything is while supplies last!
Thanks so much for stopping by today!

Tuesday, April 22, 2014

In Colors Unite

When I started making this card, I knew I wanted the little dresses, punched from the Owl Builder punch, made with the In Colors dsp stack, I love the polka dots pattern! But the rest of the card just came together with patterns and colors that I thought looked good together from the scraps that I have. When I was finished, I realized that all of these colors were or are In Colors! Cool! Except for the sentiment, which is Chocolate Chip. So here is the run down of all the colors, Blushing Bride, Pool Party, Crisp Cantaloupe, Coastal Cabana, Strawberry Slush, Pistachio Pudding, Baked Brown Sugar, and Primrose Petals. Such fun names Stampin Up picks for their colors! The stamp set I used on this is called Pennant Parade, and is on the retired list that was just released yesterday. To see everything that is retiring, check my site out here. And SU is offering FREE standard shipping all this week until Friday! Thanks so much for having a look today!!

Sunday, April 20, 2014

3D Basket

I first want to say Happy Easter to all my friends and Followers!! I have this adorable basket to share today that I found on YouTube by a fellow SU demonstrator. The link to the video is here. It's super easy to put together, it uses one 8 1/2" x 11" sheet of cardstock and no adhesive!!! The embossing is done with the Lattice EF. I did mine in an Easter color, but this would perfect done in Crumb Cake!(SU's kraft color). The brads hold is all together, and the handles actually move! It's just adorable and would be such a cute way to give a gift! Thanks so much for stopping by, and have a wonderful day!!

Friday, April 18, 2014

Stampin' Up! Framelits Holder

Hello, and Happy Good Friday! Today I have a project that was inspired by a fellow SU demo, Sam from the UK. She has tutorials on this box/holder, along with a card box and small framelits box. As you may know, Stampin' Up! is partnered with Sizzix. There is a whole bunch of framelit sets, along with embossing folders and dies. The framelits come in these plastic snap closure folders. And this box will hold about 8 sets. Here is the side view:
I used black cardstock, and my favorite pattern dsp from the Sweet Sorbet sale-a-bration papers. My ribbon is a retired Certainly Celery roll that I've had for a couple years now! It was replaced with the color Pear Pizzaz, which is a little darker. Anyway, I think this is a pretty storage box that I will love looking at on my desk!! Thanks so much for having a look, and have a wonderful weekend! We will be quite busy, so I may not make it back here until Monday!

Thursday, April 17, 2014

Punch Art Bunny

Today's Easter card is a cute punch art bunny. When making it, I fiddled a bit to what punches to use for his hands and muzzle. In the end, it all worked out! I was going to make up an instruction banner, but realized in my mds program that a couple punches I used aren't in it. They are retired SU punches, so that wouldn't work! I will list at the bottom what punches I used. I only drew on his whiskers, and stamped the Pool Party background with a jumbo wheel called So Swirly(now retired). Thanks so much for stopping by!

Punches Used:
Feet and ears: Large and small oval
Body: Ornament punch
Head: 1 3/8" circle
Hands: double punched from Blossom Builder
Muzzle: double punched from Scallop circle
Eyes and Nose: Owl Builder
Tummy: double punched from 1 3/8" Circle

Wednesday, April 16, 2014

Easter Egg

I have another Easter card to share! I created this egg shape using Stampin' Up's Oval framelits. I made a card base from Pool Party, then lined up the die so it left a bit of the fold exposed. I also left the die hang off the bottom so the card would have a flat base to sit. I cut another smaller oval from the Sweet Sorbet dsp that was available during Sale-a-Bration. The polka dot pattern adds a bit of whimsy. The sentiment is another that I printed off from MDS. A few petite petals punched flowers to finish it off. I really must get these cards into the mail today, or no one will get them before Easter!!
Thanks for stopping by!

Tuesday, April 15, 2014

Easter Basket

This is a cute Easter basket card that is so simple to put together! For the basket, I cut a piece of Crumb Cake cardstock, ran it through the Lines embossing folder, cut 3 thin strips of the same cardstock, and sponged it all with Crumb Cake ink. Using the 2013-2015 In Colors dsp stack, I punched 4 'eggs' with the extra large oval punch. I added a strip of fringed grass before gluing the eggs in place. I used dimensionals on the back to pop it up onto a So Saffron card base. The sentiment I printed off in Stampin' Up!'s My Digital Studio software, and punched it out with the scalloped oval punch.
On another note, here is what it looks like outside our front window right now:
I really dislike snow in April!!!!!!!!!!
Thank you for having a look today!


Sunday, April 13, 2014

Treat Pouch Tutorial

Hey there! Today I have a two pocket treat pouch with tutorial to share with you. I saw a larger version of this done on youtube, and I can't remember who shared it, but I have made mine a bit smaller. Here is the tutorial!
Start with a 6"x6" piece of patterned paper. I have used the Epic Day This and That Designer Series Paper from Stampin Up here. Fold in half on the diagonal.
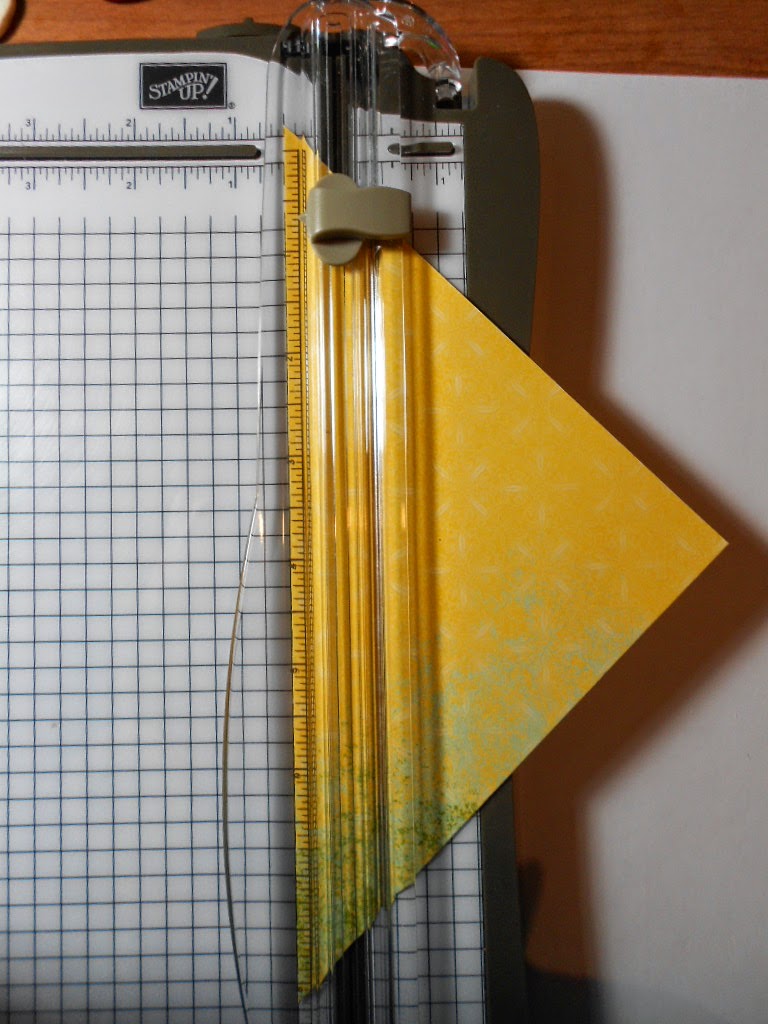
Score at 1/2" with the fold to the left.
With the fold at the top, score at 2 3/4", and 5 5/8"
Open your paper up, and keep the last step score lines vertical. Fold in each side.
Next, fold your paper up on the first horizontal score line. Flip the paper over and repeat the same step.
Fold the center score line in the opposite direction, so you end up with a V.
Fold the two sides together, keeping the pockets to the outside. I punched a hole in the top, and thread Crumb Cake Taffeta ribbon through it, and tied a bow.
To finish it off, I double punched the Artisian Label punch, using the 3/4" circle punch to accent the sentiment, which is from a Hostess set that was in the Holiday Occasions catalog(now retired). I punched a Petite Petals punch in Calypso Coral, and added a Jewels Basics Pearl to the center.
Each side of this treat holder has a little pocket, one for a goody, one for a little note. I hope you've enjoyed this tutorial, thanks so much for stopping by!!


Friday, April 11, 2014

DIY Flip It Card Using Stampin' Up! Framelit Dies

Hello! I finally have a video!! It is not the best quality because I used my phone, but I will get my camera going one of these days!! This card uses the Hearts a Flutter framelit dies from Stampin Up, to create an easy flip it card. Here is the front:
And the inside:
And here is a top view:
I hope you enjoy the video! It got cut short because my phone ran out of disk space, imagine that! :)


Thursday, April 10, 2014

Yay! A Challenge!

My SU! upline Holly, has a Stampin Up only blog called the Rubber Redneck STAMPede, and she posts challenges from sketches to color combos. All products used must be from SU!, so I thought I would make another page for my album following her sketch.

TRRSS28

The designer paper is from the retired Parker's Pattern collection. I believe you can still get this in the clearance rack on my SU! site! I also used Very Vanilla, Cherry Cobbler, and Marina Mist cardstock. Along with a couple of Candy Dots. Another quick page to fill my album!! Thanks so much for having a look!!


Wednesday, April 9, 2014

Scrapbook pages

Yes, I still scrapbook! Not as much since my little guy was actually 'little'! But I've been neglecting my scrapbooks. Just yesterday when I had my camera problems, I went through the pictures on the SD card and there are 2 year old pictures that I have never printed off! Shame! I have a brand new 6x6 album that I thought would be perfect to use up my retired Stampin Up Designer Series paper. Since the brand new catalog will have it's debut June 1, I thought I better make room for some new papers!! :) Here are two pages I finished:
This dsp is from the retired Domestic Goddess collection. I just love the colors. The stamping is from current stamp sets. I couldn't make a page without stamping SOMETHING on it! LOL Only 28 pages to go! :)
Thanks so much for stopping by today!!


Tuesday, April 8, 2014

One of Those Days

Crafting days that is. I had every intention of posting a video today, but nothing was going right. The first attempt, I glued one side of my envelope together, so had to stop it. The second try got about half way through, and my camera just shut off on it's own. So much for that idea! It's rare that I have a Tuesday off from work. No one is here, perfect for shooting a video. Maybe next time!

So my project today is a recycled envelope bag. I used an envelope that Holly had sent me. Cover it with paper, and embellishments, and you have a cute little gift bag. I will get a tutorial or video out of this some day! :)
I wanted to showcase a couple items that Stampin' Up! has on sale for their Weekly Deals that you can find here. I used the Gingham Standard Wheel stamp on the Tea Lace Paper Doily, and also the Island Indigo Baker's Twine to close up my bag. I used the Baked Brown Sugar polka dot pattern from the 2013-2015 In Colors paper stack for my background, Label Love stamp set for the sentiment, and it's matching Artisian punch. I of course had to add some sweet flowers using my favorite Petite Petals Punch!
So that's it for me today, don't know if I should venture back into my craft room or not for fear of another project going to disarray!! lol
Thanks for stopping by!!

Thursday, April 3, 2014

Trendy Arrows

Hello, and a Happy Thursday to you! Today I have a card to share that uses Stampin' Up's very first photopolymer stamp set called Designer Typeset, that was introduced last year. It's actually an alphabet set, but has some fun trendy arrows, banners and a speech bubble too. I wanted to create a stamped panel using only the arrow images. So off I went stamping each row separately. I just love how it turned out! I did not use my Stamp-a-ma-jig either, since these stamps are clear, it doesn't take much to line them up! Love that! The colors I chose are the 2013-2015 In Colors, which I totally love! I'm going to have a video in the works soon, so be on the look out for that! Have a great day, and thanks for stopping by!!

Supplies Used:
Designer Typeset Photopolymer Stamp Set #132956
Made for You stamp set #126342
2013-2015 In Color cardstock and ink pad kit #131204
Very Vanilla cardstock #101650
Artisan Label Punch #130920
Extra Large Oval Punch #119859
Large Oval Punch #119855
Calypso Coral Baker's Twine #125573


Tuesday, April 1, 2014

A Bit Monochromatic

Hello! Today's card share is a bit on the monochromatic side, using Pear Pizzazz, Gumball Green, and Summer Starfruit. I like to layer die cut/punch shapes, and also embossed cardstock patterns, so that is what I have done here! The sentiment was embossed, then die cut. Well, I'm off to work today, so have to keep this short and sweet!!! Thank you for stopping by!

Supplies Used:
Pear Pizzazz cardstock-#131201
Gumball Green cardstock-#126840
Summer Starfruit cardstock-#126839
Happy Day stamp set-#130297
Petite Petals stamp set-#133155
Perfectly You(hostess) stamp set
Pear Pizzazz Stampin Write Marker-#131266
VersaMark-#102283
5/8" Crochet Trim-#118481
Artisian Label punch-#130920
Hearts a Flutter framelits dies-#130159
Chevron embossing folder-#127749
Square Lattice embossing folder-#119976
Pearl Basic Jewels-#119247