Pages

Wednesday, December 30, 2015

Turtles


 There was a fun challenge on Monday at Splitcoast Stampers for their weekly CAS challenge, and this is what I made:


I got a new 2 in 1 computer, but it doesn't take very good photos, so this one is a bit fuzzy. Anyway, I found this cute turtle image in Pinterest, printed them out, and colored it with my Pro Markers. The sentiment comes from an MSE! set called Joy. 

I added a few colored rhinestones, and layered card stock to finish. I think it makes a cute baby card.

Thank you for having a look!

Pam

Friday, December 25, 2015

Merry Christmas!


Wishing all of you a very Merry Christmas!!

This is another of my tent cards. This one went out to my Mom. I've used the same Home for Christmas SU! papers again, this time fussy cutting the poinsettia's. I love the paper in the background. The cute snowy scene is just perfect for a Christmas card.

Thank you for stopping by, have a wonderful weekend!

Pam

Wednesday, December 23, 2015

Scarfie Gifts

Here are some more gifts that I've made.


I went shopping a couple weeks ago for some new yarn to make some scarves, and found this super soft, and thick blanket yarn. I'm in love!! It's so easy to work with, and feels wonderful through my fingers while making these!!

These are sold in large skeins, so I was able to get two from one! These were crocheted with the large N hook, with a simple single crochet in back loop throughout. I made six scarves, and could have kept going had I more yarn!! :) My son even claimed one of the turquoise scarves!

Here is a close up:


Don't know when we all will get a chance to wear these, it's suppose to be 60 degrees here in Ohio on Christmas!! But I'm not complaining!!!!

Thank you for having a look!
Pam

Monday, December 21, 2015

Snowman Valentine


I had a play with my Unity stamps today!


I made a cute snowman Valentine card! I was inspired by the Unity Stamp Co monthly challenge, which is  'Any Holiday'. I made a mask for the cute snowman, and stamped the heart behind him. The heart stamp has a flower at the bottom of it, so I punched some tiny flowers in white to cover that. They kinda look like snowflakes!

I also made a torn paper mask to make the snow mounds. I thought it needed something else, so I stamped the trees on both sides. My first Valentine ready to go! :)

Here are the Unity kits I used: Snow Way, SO This is Love, Hello my Friend-Itty Bitty

Thank you for having a look!

Pam

Salt Shaker Ornaments

Here are the ornaments I made for my coworkers:


Each one is decorated a little differently using leftover stuff from last years snowman hats, and a few new decorations. The first few I made took me awhile. I was trying to hot glue the stuff into the bottoms, and was creating a mess more than anything! The shaker opening is quite small. So then I just started to push the decorations down into them, and they stayed in place with no glue, perfect!!

A couple even have little bells in them! All of them but one have zippers for the trim, and ribbon through the shaker holes for hanging. They're pretty small, maybe 3 inches high, so they won't sag the tree when hung. Everyone seemed to like them, and I'm happy with the results!

Thanks for stopping by, and I'll have a few more handmade gifts to share this week!

Pam

Friday, December 18, 2015

Trim the Tree

Trim the Tree was the challenge on Monday at Splitcoast Stampers, and this is what I made.


I stamped this large vintage tree image from Stampabilities, then decorated it with red stickles and a gold glimmer paper punched star. Stamped the sentiment, then added some silky ribbon. Quick card to make, except for waiting on the stickles to dry!! :)

I've been busy this week finishing up gifts, wrapping, and mailing cards out. When I make cards, I never finish the inside. So it took me almost two hours yesterday to finish the insides, stamp on the envelopes, sign, and stuff! Maybe I should finish the insides as I go!! :)

I'll share some photos another day of some of the gifts I've made. Today I'm taking the gifts to work for everyone, smaller than last years snowman hats, but just as cute!

Thanks so much for visiting!!
Pam

Thursday, December 10, 2015

White Christmas

Today I have a white wintery card to share.


I was prompted by the challenge at Try It On Tuesday, which is snow, winter whites. I always love kraft, white, and a touch of blue for winter cards, so that's what I've done. The card front die cut has been getting much use lately!! It's from Spellbinders, and is from a card making set. It still looks different to me each time I use it. Must be because of the different colors I've been using with it.

Anyway, the rest of the front embellishments are made from my punches, and there is also a clear snowflake at the top that was gifted to me. The sentiment was stamped with the matching ink as the paper in the back, which has falling snow all over it.

And yes, this is another tent card :) I've made another one yesterday, and will share that one later. So for now I'll leave you with this crisp winter one! Thanks so much for stopping by my blog!

Tuesday, December 8, 2015

Merry Greenery

Hi there! I have an all green card to share today:


I followed a CAS theme using greens and neutrals for Splitcoast Stampers yesterday. I wanted a pine swag really, but don't have the right stamp for the look I wanted. So I went searching through my sets and decided to use this leafy stamp from the SU! For All Things set.

I stamped it with garden green and mint macaron to give it a two tone look. This is watercolor paper, so I spritzed my stamp with water before stamping, It gives a softer look. Then I covered the top with a double hemp twine bow. I  also inked the edges with the lighter ink.

The pretty petals 6x6 paper stack has a very close pattern to the stamp, so I used that, and made the card base darker. I love this sentiment, it comes from Market Street stamps which aren't around any more.

It's a simple yet layered card, and love how it looks. Thanks for stopping by!
Pam

Tuesday, December 1, 2015

Salt Shaker Ornament Box with Picture Tutorial


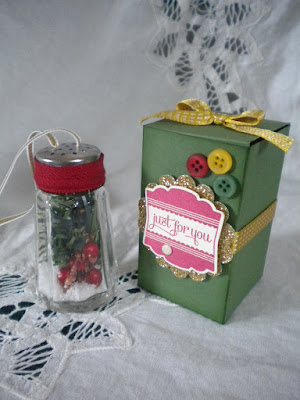
I am making these salt shaker ornaments for gifts this year, and have designed a box to gift them in.

The salt shakers themselves I bought at our local dollar store, along with a small Christmas tree. The tree was only $1.50 and the shaker set $1.65. I am cutting small pieces of the pine branches off the tree with wire snips and pushing them down into the shakers. I also bought a bag of what looks like snow to me in the home decor/vases isle. It's suppose to be used as filler for vases, but works perfect as snow!! I thread some ribbon through the lid, and hot glue on some trim, which is actually part of a zipper. I have a large bag of zippers, that I don't really know where they came from! :) And that's it, a cute ornament to hang on the tree.

Now onto the box. I just measured the size of the shaker, and designed a box around it. There is enough room inside to stuff with tissue paper as well. So here is the dimensions for the box. 3 inches tall, and each side is 1 3/4 inches wide.

Cut a piece of card stock to 7 1/4" x 7"
Starting on the long side, score at 1 3/4", 3 1/2", 5 1/4", 7"
Turn card 90 degrees to the right and score at 1 3/4", 4 3/4", 6 1/2"
Following the picture above, trim off the top, that is the 7 1/4" length, which creates the box lid.
Cut on score lines at bottom, and trim off the skinny edge, and round corners on the lid. This picture doesn't show that step.

Put adhesive on the long narrow strip, and fold box over to adhere sides. Fold in box side flaps and put adhesive on last flap to adhere. Fold over box lid to close, and decorate as desired!

Thanks so much for stopping by, and maybe you'll try one of these easy ornaments!!

Pam