Pages

Wednesday, December 30, 2015

Turtles


 There was a fun challenge on Monday at Splitcoast Stampers for their weekly CAS challenge, and this is what I made:


I got a new 2 in 1 computer, but it doesn't take very good photos, so this one is a bit fuzzy. Anyway, I found this cute turtle image in Pinterest, printed them out, and colored it with my Pro Markers. The sentiment comes from an MSE! set called Joy. 

I added a few colored rhinestones, and layered card stock to finish. I think it makes a cute baby card.

Thank you for having a look!

Pam

Friday, December 25, 2015

Merry Christmas!


Wishing all of you a very Merry Christmas!!

This is another of my tent cards. This one went out to my Mom. I've used the same Home for Christmas SU! papers again, this time fussy cutting the poinsettia's. I love the paper in the background. The cute snowy scene is just perfect for a Christmas card.

Thank you for stopping by, have a wonderful weekend!

Pam

Wednesday, December 23, 2015

Scarfie Gifts

Here are some more gifts that I've made.


I went shopping a couple weeks ago for some new yarn to make some scarves, and found this super soft, and thick blanket yarn. I'm in love!! It's so easy to work with, and feels wonderful through my fingers while making these!!

These are sold in large skeins, so I was able to get two from one! These were crocheted with the large N hook, with a simple single crochet in back loop throughout. I made six scarves, and could have kept going had I more yarn!! :) My son even claimed one of the turquoise scarves!

Here is a close up:


Don't know when we all will get a chance to wear these, it's suppose to be 60 degrees here in Ohio on Christmas!! But I'm not complaining!!!!

Thank you for having a look!
Pam

Monday, December 21, 2015

Snowman Valentine


I had a play with my Unity stamps today!


I made a cute snowman Valentine card! I was inspired by the Unity Stamp Co monthly challenge, which is  'Any Holiday'. I made a mask for the cute snowman, and stamped the heart behind him. The heart stamp has a flower at the bottom of it, so I punched some tiny flowers in white to cover that. They kinda look like snowflakes!

I also made a torn paper mask to make the snow mounds. I thought it needed something else, so I stamped the trees on both sides. My first Valentine ready to go! :)

Here are the Unity kits I used: Snow Way, SO This is Love, Hello my Friend-Itty Bitty

Thank you for having a look!

Pam

Salt Shaker Ornaments

Here are the ornaments I made for my coworkers:


Each one is decorated a little differently using leftover stuff from last years snowman hats, and a few new decorations. The first few I made took me awhile. I was trying to hot glue the stuff into the bottoms, and was creating a mess more than anything! The shaker opening is quite small. So then I just started to push the decorations down into them, and they stayed in place with no glue, perfect!!

A couple even have little bells in them! All of them but one have zippers for the trim, and ribbon through the shaker holes for hanging. They're pretty small, maybe 3 inches high, so they won't sag the tree when hung. Everyone seemed to like them, and I'm happy with the results!

Thanks for stopping by, and I'll have a few more handmade gifts to share this week!

Pam

Friday, December 18, 2015

Trim the Tree

Trim the Tree was the challenge on Monday at Splitcoast Stampers, and this is what I made.


I stamped this large vintage tree image from Stampabilities, then decorated it with red stickles and a gold glimmer paper punched star. Stamped the sentiment, then added some silky ribbon. Quick card to make, except for waiting on the stickles to dry!! :)

I've been busy this week finishing up gifts, wrapping, and mailing cards out. When I make cards, I never finish the inside. So it took me almost two hours yesterday to finish the insides, stamp on the envelopes, sign, and stuff! Maybe I should finish the insides as I go!! :)

I'll share some photos another day of some of the gifts I've made. Today I'm taking the gifts to work for everyone, smaller than last years snowman hats, but just as cute!

Thanks so much for visiting!!
Pam

Thursday, December 10, 2015

White Christmas

Today I have a white wintery card to share.


I was prompted by the challenge at Try It On Tuesday, which is snow, winter whites. I always love kraft, white, and a touch of blue for winter cards, so that's what I've done. The card front die cut has been getting much use lately!! It's from Spellbinders, and is from a card making set. It still looks different to me each time I use it. Must be because of the different colors I've been using with it.

Anyway, the rest of the front embellishments are made from my punches, and there is also a clear snowflake at the top that was gifted to me. The sentiment was stamped with the matching ink as the paper in the back, which has falling snow all over it.

And yes, this is another tent card :) I've made another one yesterday, and will share that one later. So for now I'll leave you with this crisp winter one! Thanks so much for stopping by my blog!

Tuesday, December 8, 2015

Merry Greenery

Hi there! I have an all green card to share today:


I followed a CAS theme using greens and neutrals for Splitcoast Stampers yesterday. I wanted a pine swag really, but don't have the right stamp for the look I wanted. So I went searching through my sets and decided to use this leafy stamp from the SU! For All Things set.

I stamped it with garden green and mint macaron to give it a two tone look. This is watercolor paper, so I spritzed my stamp with water before stamping, It gives a softer look. Then I covered the top with a double hemp twine bow. I  also inked the edges with the lighter ink.

The pretty petals 6x6 paper stack has a very close pattern to the stamp, so I used that, and made the card base darker. I love this sentiment, it comes from Market Street stamps which aren't around any more.

It's a simple yet layered card, and love how it looks. Thanks for stopping by!
Pam

Tuesday, December 1, 2015

Salt Shaker Ornament Box with Picture Tutorial


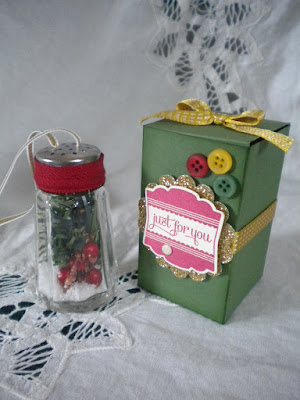
I am making these salt shaker ornaments for gifts this year, and have designed a box to gift them in.

The salt shakers themselves I bought at our local dollar store, along with a small Christmas tree. The tree was only $1.50 and the shaker set $1.65. I am cutting small pieces of the pine branches off the tree with wire snips and pushing them down into the shakers. I also bought a bag of what looks like snow to me in the home decor/vases isle. It's suppose to be used as filler for vases, but works perfect as snow!! I thread some ribbon through the lid, and hot glue on some trim, which is actually part of a zipper. I have a large bag of zippers, that I don't really know where they came from! :) And that's it, a cute ornament to hang on the tree.

Now onto the box. I just measured the size of the shaker, and designed a box around it. There is enough room inside to stuff with tissue paper as well. So here is the dimensions for the box. 3 inches tall, and each side is 1 3/4 inches wide.

Cut a piece of card stock to 7 1/4" x 7"
Starting on the long side, score at 1 3/4", 3 1/2", 5 1/4", 7"
Turn card 90 degrees to the right and score at 1 3/4", 4 3/4", 6 1/2"
Following the picture above, trim off the top, that is the 7 1/4" length, which creates the box lid.
Cut on score lines at bottom, and trim off the skinny edge, and round corners on the lid. This picture doesn't show that step.

Put adhesive on the long narrow strip, and fold box over to adhere sides. Fold in box side flaps and put adhesive on last flap to adhere. Fold over box lid to close, and decorate as desired!

Thanks so much for stopping by, and maybe you'll try one of these easy ornaments!!

Pam
 

Thursday, November 26, 2015

Christmas Foxes


Hello, and Happy Thanksgiving!! Hope everyone is enjoying the company of Family, Friends and Food!!


Today I've made this CAS Christmas card using a Unity Stamp Co. itty bitty called Foxy Christmas. I inked the stamp with markers to get the different colors. I die cut it out with the Deco framelits. The sentiment is from the same set, and I punched it out.

I embossed a vanilla panel with a Cuttlebug folder and added some sponging to the edges, as well as the other die cuts.

I was prompted to make this card for the CAS on Sunday challenge where the theme is Christmas.

Thank you for visiting!

Pam

Thursday, November 19, 2015

Die Art Roasted Turkey


I've seen a version of this using punches, but it's kinda small, so I went with a larger one using dies.


The original punch art uses the bird builder, owl builder and modern label punches. I just so happen to have the nested bird dies from Spellbinders, so they work perfect for this. I used the smallest and middle size bird dies. For this cooked turkey, you turn the birds upside down, and I did trim off their beaks. The turkey leg bone is a snowman arm from the snow friends framelits by SU! 

The roaster pan is a spellbinders label die, and I trimmed off the bottom point so it would have more of a flat bottom. I mounted it all on some patterned papers, and punched leaves in coordinating card stock.

The sentiment comes from two different stamp sets. Both have other words on them, but I just taped off what I didn't want, and stamped what I did.

I think it's cute!! I made this for the Splitcoast Stampers Ways To Use it Challenge today, where you are to create a project with a food theme.

Thanks so much for stopping by!

Pam

Tuesday, November 17, 2015

Branch Wreath

Yesterday's challenge at Splitcoast Stampers was to make a wreath using a die. I chose to use the Tattered Pinecone die cutting multiples to create a wreath.

To make this really festive, I cut a piece of red foil paper for the background. I already had the music frame that was die cut from my tent card I shared last week, so I used that as a border.

I die cut the label from gold glitter paper, and punched out the sentiment label. A few added pearls to the wreath and a both finished it off. The sentiment stamp is from Unity.

Thank you for having a look!!

Pam

Thursday, November 12, 2015

Tent Card


Hey there! Today I'm sharing my first attempt at a tent card. I saw two different tutorials for these, one was a square card with an inside floating panel, and the second was an A2 card with no floating panel. So I combined the two and made an A2 sized card with a floating panel in the middle. I love how it turned out!

The front panel designer paper from SU! was die cut with my new Spellbinders card maker series die. Last week they had a buy one get one free special, so I jumped on that!! :) The oval center was die cut with the SU! oval framelits, and I also made an oval frame to finish off the opening. 

The cute deer comes from the same dsp and is fussy cut. Some gold glimmer paper leaves were punched out and arranged, and tied together with twine. I also die cut this pretty label from the same Spellbinders set, and stamped the sentiment from a Joy Clair set.

Here is a side view of my tent card:

I think I might be hooked on these cards! It's like a window card without all the layers, but has the same look!

Thanks so much for visiting me!


Friday, November 6, 2015

Thankful

Thanksgiving will soon be here, and here is another thankful card I've made.


I followed a sketch for the layout, and decided to let the designer papers do the work for this card! I distressed the edges of them, then decided to not ink them. The white core shows up better, so I just left it.

The sentiment is from a My Sentiments Exactly set, and I stamped some leafy vines on the ends from a Unity set. Colored some rhinestones with an alcohol marker, then cut the strip into a banner.

Thanks so much for stopping by, and have a creative weekend!!

Monday, November 2, 2015

Brush Strokes plus my Halloween Outfit


I played along with a daily challenge at Splitcoast Stampers last week. The theme was 'Brush Strokes', you had to use a brush on your project, so I took it literally. I decided to make a fun background with stencil brushes and acrylic paint. I used white paint and added reinkers in 4 colors to get my paint tinted.

I just did random strokes all over, and had enough paint to fill one of my journal pages and a tag! Of course the Paper Smooches sentiment was perfect for this from the Word Salad set. I used a black card base to make the panel stand out. While making this, I thought of this quote to go on the inside: 'Through the smooth, rough, thick and thin brush strokes of life, you are there to color my world'

Now here is my groovy outfit I wore for Halloween!


I had to work all day on Halloween, so some of the Girls and I decided to dress up! The customers enjoyed our costumes!! Of course, my outfit came right out of my closet!! LOL I did buy the long wig though. Don't know if I could stand the long hair, it kept getting in my way! :)

Thanks for stopping by!

Thursday, October 29, 2015

Vintage Christmas


I was inspired to make this card following a sketch challenge for the CAS on Sunday blog. I had chosen these cute vintage papers from SU! for my Christmas cards this year. This collection is called Home for Christmas. There are loads of cute Santa's and trees for me to fussy cut and make into cards!

The tree and presents are glued down, and I put glue dots on the back of the Santa to raise him up just slightly. I cut the banner using my old Creative Memories paper trimmer, then punched the ends with the SU! banner punch. The sentiment is from the Joy Clair Christmas Wishes stamp set that I did some tweeking to.

The word Christmas is actually below the Merry. I taped off each word before inking so I could make them side by side. Since these are photopolymer stamps, I also curved them on my block to match the banner curves. Love that about clear stamps!!

A few tiny stars were stamped on the banner from the same set, then I used dimensionals to raise it up. To add to the vintage look, I sponged the vanilla panel and card base with Baked Brown Sugar.

Thanks so much for visiting today!!

Tuesday, October 27, 2015

A Thank You

I made this for today's color challenge at Splitcoast Stampers.


The colors chosen today are Crumb Cake, Mossy Meadow and Baja Breeze. I was chosen as last week's favorite for my water colored Christmas bulbs card, so I decided to make a Thank You!

I started with my woodgrain embossed layer, strip of patterned paper, then layered with a deco framelit die cut in Baja Breeze(surprised I still had some!) I only have the matching marker, so I inked my Joy Clair stamp with it and stamped the die cut. It shows up quite well!

I decided on a vellum layer, and punched it out, then embossed the sentiment onto it. The flowers on the tag are from a Unity Stamp Co. grab bag. Just added a few embellishments to finish.

I think it's a pretty color combo, and look forward to see what other's do with it!

Thank you for stopping by!

Friday, October 23, 2015

Water Color Christmas Bulbs

I made this card the other day for a color challenge at Splitcoast Stampers.


The colors to follow were Elegant Eggplant(I used Perfect Plum), Calypso Coral, Bermuda Bay and Old Olive. I decided to do some water coloring using these Christmas bulbs stamps from Market Street(no longer in business).

I stamped each bulb with the same ink. I didn't want a black outline. Then just kept coloring until I was happy with it. I went over each one about three times after letting them dry, or almost dry, to get the darker edges. Then I took an unmounted pine branch image, and just stamped until it was full enough.

I embossed the sentiment by inking in versamark then old olive, then clear powder. It doesn't show up much in the pic, but it's there! :)

Thank you for visiting today! Have a creative weekend! 
My son gets to go trick-or-treating this Sunday, fun!!!

Wednesday, October 21, 2015

Halloween Scrapbook Card

Hi there! I've made this card to go into my son's scrapbook.


The haunted house image I won from Unity! It came from a grab bag of stamps. It's really cute. I masked off the bottom part with post it's, then stamped some trees using just the tops. It made them look smaller and far away that way.

I colored in the windows and moon with an alcohol marker, and sponged the background with Hello Honey, Baked Brown Sugar and Pumpkin Pie ink from SU! The sentiment I created on my rotary stamp.

I am going to send this off to Unity's blog hop today, go check it out, and possibly win some stamps!! :)

Thanks SO much for stopping by!!

Friday, October 16, 2015

A Little Boo

Today I have another Halloween card to share. This one is note card size 3 1/2" x 5"


I was inspired by the CAS on Sunday Challenge, which is to use washi tape this time. The stamps are a retired SU! set, Googly Ghouls. I stamped the mummy and gave him a little tan shadowing with alcohol markers. Fussy cut him out, then popped him up on the layers of washi.

Stamped the sentiment off to the side, and added a googly eye to the mummy. Think I will send this one off to school for my son's Teacher. He has a 'Girl Teacher' this year. :)

Thank you for stopping by today! Have a creative weekend!!

Thursday, October 15, 2015

Sparkly Pink Stocking Card

Today at Splitcoast Stampers Ways To Use It Challenge, they are asking for shaped cards and to use pink. So I decided to use this stocking die(that's never been used!) to make a cute card.


This took me forever to make!! And it's really quite a simple design, the die does the work for you! I had to cut two pieces to make the front and back. The top part of the stocking is a separate piece, so I had to glue them to the main piece, and make sure the back side lined up. I stamped all over the front with a pretty swirly stamp from Unity.

 I wanted to put some lace or crochet trim on the top part, but after searching for 15 minutes, I realized I had given it all away!!

So, I decided to glitter it up like the toe and heel. I die cut double sided adhesive sheets, stuck them in place, then added micro fine glitter, which sticks to everything!! But even though I have sparkly bits everywhere, I love how it looks on this stocking!

Then to make the front look more girly, I added a bunch of pearls to some of the stamped swirls. Well, this made the front of the card very heavy, so I die cut another stocking, and glued it to the inside to make the back more stable.

My new Joy Clair stamp set, Christmas Wishes, had the perfect sentiment. 'Enjoy the sparkle of Christmas' that I double punched, and added some punched and sponged flowers around.

An hour and a half later............................


And it stands on it's own!! :) It's so pretty, I will have a hard time letting this one go!! LOL

Thank you for having a look!!


Wednesday, October 14, 2015

Halloween Journal Page

Adding another page to my art journal!


I made the pages of my art journal with water color paper. So each page's background will have me playing with inks and water. Last year I gave away all my Distress inks(i know, right?!), so the only black ink I have is Memento, and Versafine. Well, the Memento ink didn't work like I wanted it to. The bottom part is way to dark. I tried to add some of the Pumpkin Pie ink to it, and it helped some. But was still not happy.

So I stamped a sun on it, and made it into a web at the bottom, still not enough. Decided to add some glitter to make it look like parts of the ground. That helped fill it in some, but I still don't like it.

Now the top part is just fine with me! It's water colored with the Pumpkin Pie, then stamped with two trees from two different Unity kits, So This Is Love, and Imagine It. You can see that my ink pad didn't like the water coloring. I didn't get a good impression, and I did dry this page with my heat tool. But that just adds to the Halloween look I guess!!

The spider web at the top is another Sizzix brass embossing plate that I used as a stencil, then randomly stamped the splotches with SU!'s Gorgeous Grunge set. I don't have any Halloween sentiments other than Boo! so I didn't add any at all.

So, I'll put this page in my journal, and someday I might look back and be happy with it. lol!

I'm sending this page to Unity's hop and also to Try It On Tuesday where their theme is frightening/halloween.
Thanks so much for having a look!

Monday, October 12, 2015

Halloween!

I usually don't make many Halloween cards. But I've made a couple so far, and here is one of them.


This card base is a larger one, it's 5x7. The digi image is from The Stamping Boutique, and is called Cat Witch with Pumpkin. It's colored with alcohol markers, and I trimmed it out a little larger on the one side to put on some ribbon.

The sentiment is an older Sizzix brass embossing plate that I used as a stencil instead. The bats are made from butterfly punches. You can check out my punch art pinterest board to see how they are made. Quite easy! The background was stamped with an older SU! Weathered stamp. Kind of gives a fun look for a Halloween card.

I am sending this over to The Stamping Boutique challenge which is to use black, purple, and orange.

Thanks for having a look!!

Friday, October 9, 2015

Christmas Kitty

Splitcoast Stampers had a challenge yesterday to use a kitty on your card. And this is what I made.


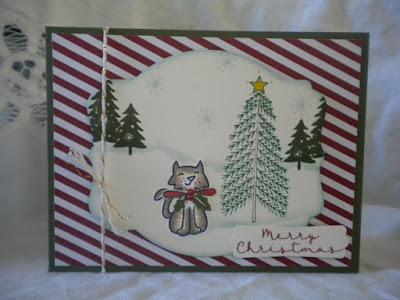
The kitty is a Lawn Fawn image from the Critters in the Burbs' stamp set, that I colored with alcohol markers. I was trying to go for a calico/tiger look. Then I decided to make a Christmas card. I know lots of cat lovers, so someone will enjoy this one.

All of the other images are from two Joy Clair stamp sets, Christmas Wishes and Joyful Wishes. I made a little scene on a Deco Label die cut, and created the snowy banks by using a torn piece of paper, and sponging ink over it.

The striped paper is from a retired SU! stack, and I added  some gold twine to the one side of the layers. The small sentiment fit perfectly in the modern label punch, it has such a sweet font.

Thanks so much for stopping by, and have a creative weekend!!

Thursday, October 8, 2015

Thankful Scarecrow

I made this card with Thanksgiving in mind. I will send it off to someone I am thankful for this season.


This is a Unity Itty Bitty rubber stamp called Scarecrow Thank You, drawn by Tracey Malnofski. I think he's adorable. I colored him in with my mix of alcohol markers, die cut and layered him with a bit of linen thread for that rustic touch.

The sentiment comes with this stamp, and I used the decorative label punch, and double punched it to make it smaller. It fits this sentiment perfectly! All papers are from SU! I thought the corn was cute with the scarecrow.

I am sending this card to the Unity blog hop tonight. Go check out lots of other Unity creations. It has been a long time since I joined in.

Thank you for having a look!

Saturday, October 3, 2015

World Card Making Day!

Happy World Card Making Day!! I don't have any plans for get togethers, or anything today, but I did make a card. How could I not?!!


I ordered some flesh tone Spectrum Noir markers, along with this image from La La Land Crafts, and they came in yesterday, so I had to have a play! This image is called Snowflake Garland Marci. It's my very first La La Land purchase. They have lots of really cute images, so I'm sure I'll be adding to my collection :) Jo Ann Fabrics had an online sale last week, 30% off your total plus free shipping. So what a bargain I got on the markers and stamp!!

Anyway, I used Spectrum Noir, Pro Markers, and Stampin Up Blendabilities to color her in. Even though they are different brands, they all work together perfectly. I'm still in 'training' with coloring hair. May have to watch a few videos to see how others do it.

After coloring, I die cut her out with the SU Oval Framelits, and punched out the sentiment. I stamped the card base with snowflakes from a Bo Bunny set. All set for mailing this Christmas!

Well, I hope you all have a fun Card Making Day! Thanks for stopping by!!

Thursday, October 1, 2015

Panda Balloons

These pandas are just the cutest!! This is my favorite stamp set, Pandamonium from Mama Elephant! I've been a panda lover since I was very young, and since I stamp, this set was just perfect for me! I've made quite a few cards with this set, but never turned them into balloons :)


I used the same panda stamp on the balloons. I just stamped the top part, punched them out, sponged with ink, then used the feet from the SU! owl builder punch for the tied end.

I put the main panda on some grass colored with Pro Markers, and gave him a little shadow with a darker green. The 'sun' and sentiment come from the Mama Elephant filigree set.

I was inspired by the Mama Elephant Stamp With ME October challenge, which they set as Birthday.

Thanks so much for visiting me!

Wednesday, September 30, 2015

Donna Downey Stamps by Unity

I love the stamps by Donna Downey from Unity Stamp Company! She has some beautiful kits.


The kit I used here is called Imagine It. It has lovely flourishes, sentiments, and the beautiful tree. I was inspired by the Unity Stamp Co. challenge using these colors:


I have not entered their challenge for about 1 1/2 years while I was a demo. But since my time is up doing that, I am more than happy to join in again. The sentiment comes from the Itty Bitty set Hello My Friend, and is layered with various punch shapes.

Thanks so much for visiting, and let me know you were here by leaving a comment ;)

Supplies Used:
Unity Stamp Co. Imagine It, Hello My Friend stamp sets
Stampin Up ink colors in Lucky Limeade, Raspberry Ripple, Tip Top Taupe, Not Quite Navy
Stampin Up card stock in Very Vanilla and Real Red, Old Olive, Raspberry Ripple
Stampin Up Linen Thread, decorative label, 1 1/2" circle, label bracket punches